Creating and Customizing Lenses
Creating and Customizing Lenses
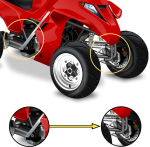
You can use lenses to annotate by magnifying and calling out specific areas of objects.

To Create a Lens Using the Annotation Lens Tool:
- Select the Annotation Lens tool from the Toolbox. (Click the Markup Highlighter to reveal the Markup tools.)

- To customize the annotation lens, configure the options in the Properties bar as described below.
- Click the object to set the viewpoint.
- Drag your cursor away from the object to set the lens location. To configure settings for your lens, see Lens Object Settings (Properties Bar).
Annotation Lens Options (Properties Bar)
Lens Shape | Select a lens shape from the drop-down menu. |
Set the width and height of the annotation lens. | |
Lens Frame Color | Choose a color for the lens frame from the color palette. |
Lens Mag | Set the lens magnification percentage value. |
Creating a Lens from an Object
If you would like a more elaborate shape, you can create a lens from any object (except a lens). If you want to preserve an object, make a copy and convert the copy to a lens. Fill inks are removed when vector or text objects are converted to lenses. The stroke on a lens is not affected by the effects applied to the lens.
You can also apply effects to a lens the same as you apply effects to other objects. See Using SpriteEffects. Lens objects let you limit an effect to a particular region of an illustration, or they let you magnify an area when you want to show a detailed view. The default lens effect is normal (100%) magnification, but you can change this if you want to see a magnified view. See Setting Lens Magnification. You can also change the viewpoint of what is displayed in the lens. By default the viewpoint is the center of the lens. If you want to offset the lens from whatever is directly behind it, you can change the viewpoint. See Setting a Lens Viewpoint.
To Create a Lens Object:
- Create an object to use as a lens. You can create a new object or copy an existing object.
- Select the object you want to use as a lens.
- Do one of the following:
- In the Properties bar, click the Make Lens button.
- Choose Object | Convert to Lens.
- In the SpriteEffects palette, select the Lens checkbox.
The object becomes a lens and remains selected.
Fill inks are removed when vector or text objects are converted to lenses.
To Copy a Lens Object:
- Select the lens object to be copied.
- Do one of the following:
- Choose Edit | Copy, then Edit | Paste.
- Choose Edit | Duplicate.
Setting Lens Magnification
You can set the magnification level of a lens so objects appear magnified (or reduced) in the lens. The default lens effect is normal (100%) magnification. You can set the magnification level with or without other effects applied to a lens.
| Basic lens With the magnification set to 300% and its viewpoint set about 2 inches to the right, a lens made from a circle shows a detail view of an illustration. |

Magnification affects the view through the lens to the lens viewpoint. If the default viewpoint (at the center of the lens) is used, the lens displays a magnified view of objects behind the lens. If the viewpoint has been moved, the lens shows a magnified view of objects behind the viewpoint. These options are available in the Properties bar, SpriteEffects palette or after you create a lens with the Object | Convert to Lens command.
When you change the magnification value, the lens view changes, unless the Frozen option is selected in the SpriteEffects palette. (See Freezing a Lens.)
To Set Magnification:
- Select the lens object.
- Do one of the following:
- In the Properties bar, enter the magnification value in the Lens Mag text box.
- In the SpriteEffects palette, enter the magnification value in the Mag text box.
Lens Object Settings (Properties Bar)
Lens X/Y | If Absolute is selected, these settings refer to the distance from the rulers’ zero point to the viewpoint. If Relative is selected, these settings refer to the distance from the center of the lens to the viewpoint. |
Choose | Click this button when you want to click in the document to set the viewpoint for a lens. |
Reset | Click this button to reset the viewpoint to the center of the lens object. |
Absolute or Relative | Absolute refers to the distance from the rulers’ zero point to the viewpoint. Relative refers to the distance from the center of the lens to the viewpoint. |
Lens Mag | Enter the magnification value in the text box. |
Advanced | Click this button to open the SpriteEffects palette. |
Lens Options (SpriteEffects Palette)
Lens | Select the Lens checkbox to create a lens. |
Mag | Enter a magnification value. |
Frozen | Freeze the lens view. |
Viewpoint | Viewpoint settings:
|
Setting a Lens Viewpoint
The viewpoint of a lens is a point in the document that appears in the lens. The default viewpoint is at the center of the lens, so the lens displays whatever is directly behind it. You can move the viewpoint of a lens to make any location appear in the lens, which is useful for displaying close-ups of illustrations. The center of a lens is focused on the lens viewpoint. If you move the viewpoint, the new location appears centered in the lens object. The viewpoint of a lens can be set anywhere on the same page, slide, sheet, or frame as the lens object. Lenses can display objects on all visible layers on the same page, sheet, slide, or frame. Lenses do not display objects on other pages, sheets, slides, or frames.
You can set a viewpoint visually by clicking in the document, or precisely, by entering values for the Absolute or Relative position.
To Set a Viewpoint Visually:
- Select the lens object.
- In the Properties bar or SpriteEffects palette, select Relative or Absolute.
- Click Choose.
Move the pointer in the document and click to set the viewpoint.
The area you click appears centered in the lens.
To Set a Viewpoint Precisely:
- Select the lens object.
- In the Properties bar or SpriteEffects palette, select one of the following:
- Absolute: Select Absolute and enter horizontal (X) and vertical (Y) distances from the rulers’ zero point to the viewpoint; e.g., enter 0 in the X and Y boxes to set the viewpoint at the zero point. If you move the lens object, the viewpoint does not change.
- Relative: Select Relative and enter horizontal (X) and vertical (Y) distances from the center of the lens to the viewpoint. Positive values move the viewpoint down and right of the lens center. Negative values move the viewpoint up and left of the lens center; e.g., to set the viewpoint 1 ruler unit left of the lens center, enter -1 (X) and 0 (Y). If you move the lens, the viewpoint changes.
To Reset a Viewpoint:
- Select the lens object.
- In the SpriteEffects palette, click the Reset button to reset the viewpoint to the center of the lens object.
This resets the location values to 0, 0 if Relative is selected. If Absolute is selected, the location is measured from the rulers’ zero point to the lens center.
Absolute and Relative Viewpoints
An absolute viewpoint is set at a specific location in a document and does not move. The lens shows the same absolute point no matter where the lens is placed on the page.
A relative viewpoint is set at a specific distance from the center of the lens. If you move the lens, the viewpoint moves the same distance and direction. When Frozen is selected, the view in the lens does not change; if you deselect the Frozen option, the view then changes to the current viewpoint.
To Set the Relationship of the Viewpoint to a Lens Object:
In the SpriteEffects palette, select Absolute or Relative.
|
|
Relative viewpoint | Absolute viewpoint |

To Create an Object at the Lens Viewpoint:
It is possible to create a vector object at the lens viewpoint.
The shape of the vector object will be the same as the lens object.
- Select the lens object and choose a viewpoint.
- In the Properties bar, click the Advanced button.
In the SpriteEffects palette, select Create Object at ViewPoint from the palette menu.
You can modify the inks and strokes of the new object and also apply any vector effect.
Lenses and Stacking Order
The view through a lens depends on the stacking order of the lens, as well as the position of the viewpoint.
Only objects that are behind a lens in the stacking order can be seen through the lens. A lens and its viewpoint are at the same level in the stacking order.
Use the stacking order to change a lens view. Send a lens to the back of the stack so nothing appears in it. Bring it to the front so all the objects at the viewpoint appear in the lens.
Due to the stacking order, objects that you create after you create a lens cannot appear in the lens. Also, objects that you move to the front of the stack after you create a lens cannot appear in the lens.
You can use a lens to display layered views; e.g., you can draw a map and create a lens to show a close-up of an area. If you add text after you create the lens, the text is higher in the stacking order. The text will not appear in the lens close-up of the map.
Freezing a Lens
Select the Frozen checkbox in the SpriteEffects palette to freeze the lens object's current view; i.e., the view won’t change unless you deselect the Frozen checkbox. If you change the fill color of an object, the lens will not show the change. Deselect the Frozen checkbox and Canvas X Draw updates the lens view.
Selecting Frozen overrides a lens relative viewpoint; the lens will show the same view after being moved. If you deselect Frozen, the lens will display the new viewpoint location.
The Frozen checkbox is only available if you select Grayscale, RGB, or CMYK from the Mode menu. If None is selected, the Frozen checkbox is not available.
Freezing a lens can avoid slow performance when you edit objects shown in a lens. When you finish editing, select the lens and deselect the Frozen checkbox to update the viewpoint.
To Freeze a Lens:
- Select the lens object.
- In the SpriteEffects palette, select the Frozen checkbox.
- Deselect the Frozen checkbox to show the new viewpoint.
Related Articles
Creating and Customizing Lenses
Creating and Customizing Lenses You can use lenses to annotate by magnifying and calling out specific areas of objects. To Create a Lens Using the Annotation Lens Tool: Select the Annotation Lens tool from the Toolbox. To customize the annotation ...Creating and Customizing Lenses
Creating and Customizing Lenses You can use lenses to annotate by magnifying and calling out specific areas of objects. To Create a Lens Using the Annotation Lens Tool: Select the Annotation Lens tool from the Toolbox. (Click the Markup Highlighter ...Customizing Dashes
Customizing Dashes Dashes are composed of alternating solid and blank segments. Using the Dash manager, you can customize the length of up to 13 segments to create new, complex dash sequences. Dash stroke You can design dashes interactively using the ...Customizing Dashes
Customizing Dashes Dashes are composed of alternating solid and blank segments. Using the Dash manager, you can customize the length of up to 13 segments to create new, complex dash sequences. Dash stroke You can design dashes interactively using the ...Customizing Dashes
Customizing Dashes Dashes are composed of alternating solid and blank segments. Using the Dash manager, you can customize the length of up to 13 segments to create new, complex dash sequences. Dash stroke You can design dashes interactively using the ...