Reshaping Paths by Editing Anchor Points
Reshaping Paths by Editing Anchor Points
A path can contain two kinds of anchor points: smooth points and corner points.
- Smooth point: An anchor point that connects two curve segments where the curve flows smoothly through the anchor point without a sharp change in direction. Circles and sine waves are examples of paths that have only smooth anchor points.
- Corner point: An anchor point where the path makes a sharp turn at the anchor point. Corner points can connect two straight segments, two curved segments, or one curved and one straight segment.
Tangent Lines
All smooth points, and some corner points, have tangent lines passing through them. Canvas displays the tangent lines when a point is selected.
A corner point can have one, two, or no tangent lines.When you select a corner anchor point with two tangent lines, each tangent line can move independently.
| A corner anchor point with independent tangent lines |

When you create paths with only straight segments, the anchor points are corner points. When you draw curved paths with the Curve, Freehand, or Auto Curve tools, the anchor points are smooth points. Adding anchor points to curved segments produces smooth points.
To Change a Smooth Point to a Corner Point:
You can edit, reshape, and resize two adjoining curve segments independently by converting their smooth anchor point to a corner point.
- With the object in Edit mode, click the anchor point to reveal its tangent lines.
- Press Tab and drag one of the handles to move one of the tangent lines. The tangent line pivots at the anchor point and affects only one side of the anchor point.
| Tab-click a corner point’s handle to snap the other tangent line into alignment and smooth the path |


To Change a Corner Point to a Smooth Point:
To smooth out a sharp turn in curved segments, change the corner point between them to a smooth point.
The corner point must have two tangent lines for this procedure. If it has fewer than two, first add tangent lines to the point.
- With the object in Edit mode, click the anchor point to display its tangent lines.
- Tab-click the handle of the tangent line you want to keep in place; the other tangent line snaps into alignment.
Adding and Removing Tangent Lines
An anchor point can have as many as two tangent line segments. Corner points can have one, two, or no tangent lines, and smooth points must have two. You can quickly convert a smooth point to a corner point by deleting one of its tangent lines. Also, to convert a corner point with one or no tangent lines to a smooth point, you must add tangent lines.
To Add a Tangent Line:
- In Path Edit mode, select an anchor point with one or no tangent lines. The anchor point cannot be an endpoint with one tangent line, because endpoints can have only one tangent line.
- Press Tab and drag away from the anchor point to place a new tangent line segment. You can also right-click and choose Add Handle in the context menu. As you do this, the new tangent line begins altering the segment based on how you drag to position the tangent line.
- Repeat the previous step to add a second tangent line.
To Delete Tangent Lines:
- In Edit mode, click an anchor point to display its tangent lines.
- Depending on how you want to edit the anchor point, do one of the following:
- To delete one tangent line: Right-click the tangent line handle and choose Delete Handle in the context menu. You must use this method for anchor points with only one tangent line, and to delete one of two tangent lines attached to an anchor point.
- To delete an endpoint’s tangent line: You can also Tab-click the anchor point.
- To simultaneously delete both tangent lines of an anchor point: Tab-click the point.
Straightening Curve Segments
Straighten a curved segment by selecting it and using the Straighten command in the context menu. This command deletes the tangent line(s) that curve the segment.
To Straighten a Segment:
- With the object in Edit mode, right-click the curved segment that you want to straighten.
- Choose Straighten in the context menu.
Reshaping Curve Segments
To adjust the shape of a curve, in addition to moving points and segments along the path itself, you can adjust the tangent lines that control the curve. The angle of the tangent line affects the curve shape, while the length of the tangent line affects the size of the segment.
At a smooth anchor point, adjusting the angle of a tangent line affects the curves on both sides of the anchor point. At a corner anchor point, you can reshape the segments on each side independently. (See -Reshaping Paths by Editing Anchor Points.)
To Reshape a Curved Segment:
- With the object in Edit mode, click one of the segment’s anchor points to display its tangent lines.
- Drag the handle of the tangent line to change the shape of the associated curve. In the case of a smooth point, the tangent line affects both adjacent curve segments.
Path Editing Shortcuts
To do this | Shortcut |
Add an anchor point | Ctrl-click path |
Delete an anchor point | Ctrl+Shift-click anchor point |
Change the length of the tangent lines on both sides of a smooth anchor point at the same time | Ctrl-drag tangent line handle |
Constrain tangent line to 45-degree increments | Shift-drag tangent line handle |
Move tangent line segment independently (change anchor point from smooth to cusp) | Tab-drag tangent line handle |
Align tangent line segments (change corner point with two tangent lines to smooth point) | Tab-drag tangent line handle |
Add tangent line to an anchor point | Tab-drag an anchor point |
Delete an anchor point’s tangent lines | Tab-click the anchor point or endpoint |
Close an open path | Alt-click an endpoint |
Reshape a segment without changing the tangent line angles | Press Tab and drag the segment |
Reshape A segment and adjacent segments | Press Alt and drag a segment |
Converting Objects and Text to Paths
Some vector objects have specialized properties and unique edit modes instead of the standard Path Edit mode; e.g., you cannot directly edit the path segments of dynamic objects, concentric circles, grids, multigons, spirals, and objects modified by the Envelope or Extrude commands; however, you can convert these objects to paths so you can edit them the same as any other vector object.
If you create paths from a specialized vector object, the new shape does not have the same unique editing capabilities as the original; e.g., if you convert a Multigon star object to paths, you can no longer use the edit handles that let you adjust the depth and twirl of the points. Similarly, placed dynamic objects are no longer linked to their parent objects in the Symbol Library palette after you convert them to paths.
You can also convert text so you can reshape characters as vector objects. This has the benefit of making the characters independent of their fonts; the font is no longer required to view and print the characters properly. However, once you convert text to paths, you can no longer perform text operations, such as editing, spell-checking, and formatting, on the text. Also, characters with “holes” in them (such as a, b, d, e, g, o, p, r, and q) are converted to composite paths, which cannot be extruded.
To Convert an Object to Paths:
- Select the object you want to convert.
- Choose Path | Convert to Paths. Canvas converts the object to one or more paths.
To Convert Objects to Simple Paths:
This operation facilitates the rapid conversion of vector objects into a simple path. Now any Canvas object or a group of objects can be converted into simple paths. At the same time, these objects will maintain their Canvas inks settings and stroke types.
The Convert to Simple Paths command breaks down everything Convert to path does not. It also breaks down strokes and inks to simple, yet editable, Bézier paths and polygons.
- First select the object.
- Choose Path | Convert to Simple Paths.
- After completing this operation, choose Object | Ungroup.
At this point, all high level drawing features that are contained in the object are reduced to individually editable polygon and Bézier objects.
To Convert to a Polygon:
You can convert Bézier curves, ovals, text objects, grouped objects, composites, and EasyShapes to polygons.
- Select one or more Bézier curve, oval, EasyShape, text object, grouped object, or composite.
- Choose Path | Convert to Polygon.
Outlining Path Stroke
An illustrator may find it necessary to outline a path stroke when working with logos, intricate artwork, or traced images, etc., especially if the illustrations will be resized.
|
|
Illustration with a 6—point stroke resized to be 50% smaller Even when reduced, the object maintains stroke size | Illustration with a converted stroke resized by 50% After conversion, the stroke size is no longer a factor when reducing objects |


To Outline a Path Stroke:
Select the vector object and choose Path | Outline Path Stroke.
You can apply this command to more than one selected vector object or even a grouped object.
|
|
Original illustration | Illustration with outlined path stroke |


To Ungroup Objects Made of Multiple Paths:
When you convert multiple objects, characters, or specialized vector objects to paths, Canvas creates a separate path for each shape and groups them.
Choose Object | Ungroup to separate them.
For example, if you convert a five-letter word to paths, the resulting object is a group of five paths. To edit just one of the five paths, first choose Object | Ungroup. Or, use the Direct Selection tool to select one path without ungrouping.
Making and Breaking Composite Paths
Create openings in a filled path by incorporating multiple paths into a single, composite path. Areas between the paths and areas where the paths intersect are transparent.
To Create a Composite Path from Multiple Paths:
Select the paths you want to make into a composite path. Choose Object | Make Composite or click the Make Composite button in the Properties bar.
To Separate a Composite Path:
Select the composite path and choose Object | Break Composite or click the Break Composite button in the Properties bar.
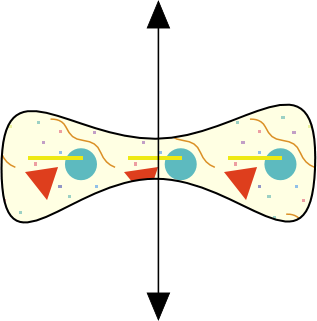
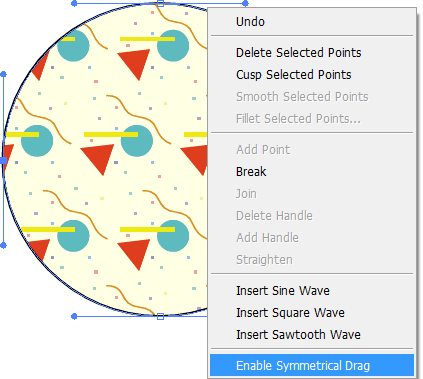
To Symmetrically Resize Path Points:
When using the Symmetrical Drag feature, you can easily create a symmetrical design from a circle, rectangle, or a complex group of objects.
- Select an object and place it into Path Edit mode.
- Right-click to open the context menu.
- Choose Enable Symmetrical Drag.
- Release the mouse and select any of the object’s control points.
- Drag to create a new shape for the object.
You also have the ability to select all of the control points, and drag. Doing so will allow you to quickly resize the object while retaining proper object constraints.
When you drag the selected control points, notice that the shape is resized from the center of the object.
|  Dragging will resize the object |
Related Articles
Reshaping Paths by Editing Anchor Points
Reshaping Paths by Editing Anchor Points A path can contain two kinds of anchor points: smooth points and corner points. Smooth point: An anchor point that connects two curve segments where the curve flows smoothly through the anchor point without a ...Reshaping Paths by Editing Anchor Points
Reshaping Paths by Editing Anchor Points A path can contain two kinds of anchor points: smooth points and corner points. Smooth point: An anchor point that connects two curve segments where the curve flows smoothly through the anchor point without a ...Reshaping Paths by Editing Anchor Points
Reshaping Paths by Editing Anchor Points A path can contain two kinds of anchor points: smooth points and corner points. Smooth point: An anchor point that connects two curve segments where the curve flows smoothly through the anchor point without a ...Editing Object Paths
Editing Object Paths Most vector objects in Canvas X Draw are paths. Whether you draw with Path tools (Curve, Freehand, Polygon, Smooth Polygon, Auto Curve) or other shape tools (Rectangle, Oval, Line, Arc), you create paths, and you can use the same ...Editing Object Paths
Editing Object Paths Most vector objects in Canvas X Draw are paths. Whether you draw with Path tools (Curve, Freehand, Polygon, Smooth Polygon, Auto Curve) or other shape tools (Rectangle, Oval, Line, Arc), you create paths, and you can use the same ...