Rotating, Skewing, and Flipping Objects
Rotating, Skewing, and Flipping Objects
You can rotate Canvas X Draw objects clockwise or counter-clockwise, flip them on one or both axes, and skew their bounding boxes. Rotate and skew around an object’s center, or move the centerpoint to any location.
When you rotate an object, the object’s bounding box also rotates. If you drag a selection handle of a rotated object, the bounding box changes shape in the rotated orientation, so you can resize an object without distorting its basic shape.
To Remove Effects:
After you rotate, skew, or flip objects, you can return them to their original orientation and shape.
Select the objects and choose Effects | Remove Effects.
To Return the Rotated Bounding Box to its Original Orientation:
Choose Path | Convert to Paths.
Rotating and Skewing in Freeform Mode
When you put an object in Freeform mode, you can rotate and skew it by dragging special handles.
To Put an Object in Freeform Mode:
Select the object and choose Effects | Freeform. Rotation and skewing handles and the object’s centerpoint appear.
You can also put a selected object in Freeform mode by clicking it. This depends on a setting in the Configuration Center. (See Setting Preferences.)
To End Freeform Mode:
Click away from the object, or press Esc.
Rotating Objects in Freeform Mode
In Freeform mode, the circular handles at each corner of the bounding box are rotation handles. The circle and crosshair in the center of the object is the point around which the object rotates.
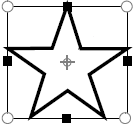
To Rotate an Object in Freeform Mode:
Drag one of the four corner handles. An outline of the object rotates as you drag a handle.
To Set the Center of Rotation:
Drag the centerpoint to a new location anywhere on the screen. To make the centerpoint snap to one of the handles or the center, press Shift as you drag.
Rotating Objects
If you prefer to rotate objects a specified amount, use the following commands from the Effects menu:
- Rotate Right: Choose 90, 45, or 30°, or Other to open the Rotate dialog box and specify rotation options.
- Rotate Left: Choose 90, 45, or 30°, or Other to open the Rotate dialog box and specify rotation options.
- Horizontalize: The Horizontalize command rotates a selected object along a defined horizontal line. This command is useful when trying to straighten image objects.
Rotate Options
Direction | Click the Clockwise or Anticlockwise button to set the direction of rotation. |
Center | Set the center of rotation. By default the center of the object is selected. |
Angle | Set the angle of rotation. |
Choose this option to render and rotate the background area of the image. | |
Select this option to have a smoother, better quality image. |
To Apply the Horizontalize Command:
- Select the object.
- Choose Effects | Horizontalize. The cursor changes to a crosshair.
- Click the crosshair to establish the start point of the horizontal line.
- Click the crosshair again to indicate the end point of the horizontal line.
- In the Rotate dialog box, select a handle in the bounding box icon to define the center of rotation.
- Enter the direction and angle of rotation.
- Click Apply to see the effect and then OK to close the dialog box.
Skewing Objects in Freeform Mode
When an object is in Freeform mode, slant its shape by dragging the horizontal and vertical skew handles. Skewing an object reshapes it by changing the relationship of the horizontal and vertical axes to the skew centerpoint.
Canvas X Draw skews objects around a centerpoint that you can position to achieve the desired effect. Drag the centerpoint to any position inside or outside the object. The location of the skew centerpoint changes the effect of dragging a skew handle on the object.
You can also skew objects by clicking the Skew button in the Properties bar. Select a skew option, then enter a degree value in the field, and press Enter.
To position the centerpoint on one of the freeform handles or in the center of the object, Shift-drag the centerpoint to place it.
To Skew an Object Horizontally:
Drag a horizontal skew handle to the left or right.
To Skew Vertically:
Drag a vertical skew handle up or down.
Transformed Dimensions vs. Untransformed Dimensions
If you plan on transforming objects, you have the option of maintaining the object’s original dimensions or allowing the object’s dimensions to be altered after the transformation.
Click on the Transform icon in the Properties bar and select either Transformed Dimensions or Untransformed Dimensions.
If you select Transformed Dimensions, the object’s original dimensions will be retained after being transformed.
If, however, you select Untransformed Dimensions, the object’s dimensions will change when the transformation is applied.
![]()
In the example above, a 2” x 1” rectangle is horizontally skewed by 20°.
When Transformed Dimensions is applied, the rectangle maintains its original width when horizontally skewed.
When Untransformed Dimensions is used, the rectangle’s width changes.
Freeform Editing of Floating Image Selections
Use the Freeform command to place floating image selections in Freeform Edit mode. When you put an image selection in Freeform mode, rotate and skew it by dragging special handles.
To Float a Copy of a Selection:
- With a paint object in Edit mode, make a selection with the Marquee or Lasso tool. The selection can encompass the entire paint object.
- Do one of the following:
- Choose Image | Select | Float.
Ctrl-drag the selection. This moves the selection and puts it in Freeform mode.

You can also paste an object into an image in Edit mode. The object pastes into the image as a floating selection.
For more information on image selections, see Working with Image Selections.
To Put a Floating Image Selection in Freeform Mode:
While a floating image selection is active, choose Effects | Freeform. Handles appear on the corners and sides of the floating selection.
To Move a Selection in Freeform Mode:
Place the pointer inside of the selection. The pointer becomes an arrow head. Drag to move an outline of the selection.
Rotating Selections in Freeform Mode
In Freeform mode, while the pointer is outside of the selection, the pointer is a curved line with an arrow at both ends. This is the rotation pointer.
Drag around the selection in the direction you want it to rotate. An outline of the selection rotates as you drag.
Press the Shift key to constrain the rotation to 15° increments.
 Rotation pointer |  Scale pointer |
Scaling Selections in Freeform Mode
You can scale a floating selection in Freeform mode by dragging the corner or side handles.
To Scale a Selection:
Point to one of the handles at the edges of the selection. The pointer changes to a straight line with an arrow at each end. Drag any of the handles. The selection scales as you drag.
- If you drag a side handle, the scaling is constrained to the direction of the arrows in the pointer – the direction perpendicular to the handle side.
- If you drag a corner handle, the scaling is unconstrained unless you press the Shift key.
- Press the Alt key to mirror the scale on the opposite side of the selection.
Skewing Selections in Freeform Mode
When a selection is in Freeform mode, you can slant its shape by dragging the side handles with the Ctrl key pressed. Skewing a selection reshapes it by changing the relationship of the sides of the selection.
| Skew outline and Skew pointer |

To Skew a Selection:
Press the Ctrl key and move the pointer over one of the side handles. The pointer changes to an arrow head. Drag the handle to skew the selection freely.
- Press the Shift key to constrain the skew along the axis of the handle side.
- Press Alt to have the opposite side of the selection skew to maintain its relationship to the side you are skewing around the center of the selection.
The modifier keys can be combined to produce both skewing effects simultaneously.
To End Freeform Editing:
Double-click inside the selection or press Enter twice. The floating selection is still active. Then double-click outside the paint object or press Enter twice to paste the pixels as defined by the floating selection into the image.
If you do not want to change your original image, press Esc to leave Freeform mode. Canvas X Draw makes no changes to the image.
Rotating Objects with the Rotate Command
For precise rotations, use the Rotate command to rotate selected objects in 0.01° increments around a specified center of rotation. This command is useful if you need to rotate multiple objects an exact amount.
You can also rotate objects by clicking the Rotate button in the Properties bar. Select a rotate option, then enter a degree value in the field, and press Enter.
To Rotate Objects:
- Select the object you want to rotate.
- Choose Effects | Rotate Right/Left | Other to open the Rotate dialog box.
- In the Rotate dialog box, click the clockwise or counter-clockwise button to choose a rotation direction.
- Enter the rotation angle in degrees in the Angle text box.
- The Center edit box shows the center of rotation as a gray handle. To change it, click one of the black handles on the bounding box; the gray handle snaps to the new location.
- Click Apply to preview the settings, or click OK to implement the settings and close the dialog box.
Editing Rotated Objects
When you rotate an object, the object’s bounding box also rotates, so you can reshape and resize the object in rotated space. If you drag a handle, the object’s sides keep their rotated orientation. This prevents distortion of the original shape.


Flipping Objects
Flip objects horizontally, vertically, and both horizontally and vertically, with the Flip commands. You can flip individual objects, multiple selected objects, or grouped objects. When you flip a group object, objects included in the group flip around the axes of the group’s bounding box.

To Flip a Selected Object from Top to Bottom:
Do one of the following:
- In the Properties bar, with the object selected, press the Flip Vertical button.

- Choose Effects | Flip | Vertical. The Vertical command flips the selection’s vertical coordinates over its horizontal axis.
To Flip a Selected Object from Left to Right:
Do one of the following:
- In the Properties bar, with the object selected, press the Flip Horizontal button.

- Choose Effects | Flip | Horizontal. The Horizontal command flips the selection’s horizontal coordinates over its vertical axis.
To Flip a Selection Around Both Axes:
Choose Effects | Flip | Both Axes. Canvas X Draw flips the selection’s horizontal coordinates over its vertical axis and its vertical coordinates over its horizontal axis.
Related Articles
Rotating, Skewing, and Flipping Objects
Rotating, Skewing, and Flipping Objects You can rotate Canvas X Draw objects clockwise or counter-clockwise, flip them on one or both axes, and skew their bounding boxes. Rotate and skew around an object’s center, or move the centerpoint to any ...Rotating, Skewing, and Flipping Objects
Rotating, Skewing, and Flipping Objects You can rotate Canvas X Draw objects clockwise or counter-clockwise, flip them on one or both axes, and skew their bounding boxes. Rotate and skew around an object’s center, or move the centerpoint to any ...Rotating, Skewing, and Flipping Objects
Rotating, Skewing, and Flipping Objects You can rotate Canvas X Draw objects clockwise or counter-clockwise, flip them on one or both axes, and skew their bounding boxes. Rotate and skew around an object’s center, or move the centerpoint to any ...Rotating Images
Rotating Images Canvas X Draw gives you the ability of applying a soft rotate or hard rotate to your images. A soft rotate is sufficient if you do not need to export the images to another format; however, if you plan on exporting your images and need ...Rotating Images
Rotating Images Canvas X Draw gives you the ability of applying a soft rotate or hard rotate to your images. A soft rotate is sufficient if you do not need to export the images to another format; however, if you plan on exporting your images and need ...