Viewing the Smart Toolbox
Viewing the Smart Toolbox
Select any tool in the Smart Toolbox and its palette, as well as related tools, automatically opens and snaps to the right of the Toolbox. The tool palette remains in that position until another tool is selected.

To Lock a Tool Palette:
Click on the Lock icon. When you select another tool, its palette snaps to the right of the locked palette.
You can relocate palettes to another part of the layout area. To do so, place the pointer on the palette title bar and Shift-drag the palette from the Toolbox.
To Unlock a Locked Palette:
Click the Lock icon.
Using the Tools
In the Smart Toolbox, tools are represented by icons in two columns. The tools that aren’t displayed are available on tool palettes that snap to the Toolbox when opened.
To Select a Tool Displayed in the Toolbox or Tool Palette:
Click the tool. The selected tool is shaded, like a recessed button.
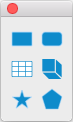
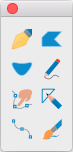
Tool Palettes
This diagram identifies the default tool palettes in the Toolbox. Click on a tool icon and its respective palette opens. (See Viewing the Smart Toolbox.)
Selection tools |
Line tools |
Rectangle |
Oval tools |
Markup tools |
Miscellaneous |
Painting tools |
Text tools |
Path tools |
Dimensioning |
Transparency |
Color Dropper tool
Annotation Lens tool
Visual Combine tool
View tools |
Attribute Dropper tool
Camera tool
Smart Vector Fill tool
Measure Path tool | ||


To Access Tool Palettes and Tools via the Toolbox Command:
If you are looking for a particular tool and are unsure where it is located in the Toolbox, choose Window | Toolbox to see the various tool groups.
To Open a Tool Palette:
Click on the arrow icon and select Show Group. The tool palette automatically opens and snaps to the right of the Toolbox.
To Access an Individual Tool:
Click on the arrow icon and select the particular tool from the menu. The tool will be selected in the Toolbox.
Hotkeys
You must be in Image Edit mode to use the hotkeys.
Use the following single-letter hotkeys when editing images:
Hotkey | Tool/Action |
A | Airbrush Tool |
B | Paintbrush Tool |
‘ (accent grave) or C | Set Default Stroke / Fill |
D | Sponge Tool |
E | Eraser Tool |
F | Blur Tool |
G | Blend Tool |
H | Marker Tool |
K | Bucket Tool |
L | Image Lasso Tool |
M | Marque Tool |
N | Burn Tool |
O | Dodge Tool |
P | Pencil Tool |
Q | Sharpen Tool |
R | Red Eye Reduction Tool |
S | Rubber Stamp Tool |
T | Neon Tool |
U | Smudge Tool |
V | Remote Move Tool |
X | Swap Fill / Stroke |
W | Wand Tool |
Option 0 - 9 | Switch Channels |
Related Articles
Viewing the Smart Toolbox
Viewing the Smart Toolbox Select any tool in the Smart Toolbox and its palette, as well as related tools, automatically opens and snaps to the right of the Toolbox. The tool palette remains in that position until another tool is selected. To Display ...Using the Smart Vector Fill Tool
Using the Smart Vector Fill Tool With the Smart Vector Fill tool you can apply a fill to overlapping areas of vector objects. The tool creates a closed vector object which is equivalent to the area defined by multiple vector segments. To Use the ...Using the Smart Vector Fill Tool
Using the Smart Vector Fill Tool With the Smart Vector Fill tool you can apply a fill to overlapping areas of vector objects. The tool creates a closed vector object which is equivalent to the area defined by multiple vector segments. To Use the ...Using the Smart Vector Fill Tool
Using the Smart Vector Fill Tool With the Smart Vector Fill tool you can apply a fill to overlapping areas of vector objects. The tool creates a closed vector object which is equivalent to the area defined by multiple vector segments. To Use the ...Viewing Documents
Viewing Documents This section describes how you can adjust your view of a document. Viewing options in Canvas X Draw lets you: Control when Canvas X Draw redraws objects. Scroll to any area with the Hand tool or scroll bars. Increase or decrease the ...